
Repository 생성하기
Git 다운로드<<< Git 설치 안되신 분들은 먼저 설치해 주세요

New repository를 눌러서 개인 Repo를 생성해 줍니다.

Repository : 자신의 Repo 이름을 적습니다.
Description : 해당 Repo의 설명을 적습니다. 비워두셔도 무관합니다.
공개 범위를 Public으로 설정해 줍니다.
[Create repository]를 눌러 생성해 줍니다.
Local 환경으로 Clone 하기

빨간 동그라미로 표시해 둔 복사버튼을 눌러둡니다.
이후 바탕화면에서 새로운 폴더를 만들고 폴더로 들어가 명령 프롬프트를 켜줍니다.

주소창에 cmd라고 입력하고 엔터 누르시면 명령 프롬프트창이 나옵니다.

해당 창에서 clone 명령어를 입력합니다. 아래와 같은 형식으로 입력하고 엔터를 누르시면 됩니다.
git clone {복사한 주소}
오류가 없다면 위 사진과 같이 폴더로 Repository가 clone 됩니다.
Local 환경에서 Repository로 커밋하기

해당 폴더의 repository로 들어가서 test.txt를 만들어줍니다.
이후 기억할 건 add, commit, push 이 3단계만 기억하면 됩니다.
다시 명령 프롬프트를 켜줍니다.
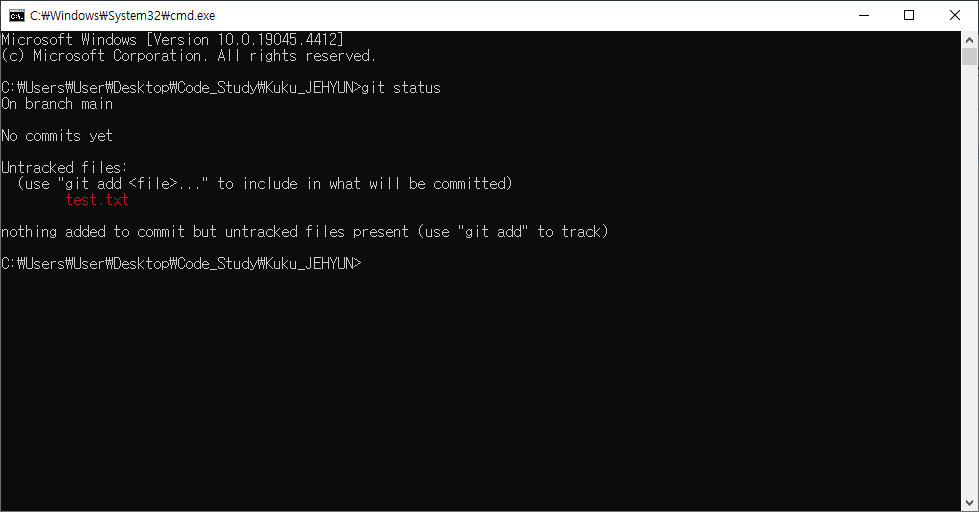
git status현재 커밋 상황을 보기 위해 위 명령어를 입력해 주면 사진과 같이 test.txt 파일이
빨간 글씨로 나오는 것을 볼 수 있습니다.
(해당 파일이 stage에 올라가지 않았다는 말입니다.)
무튼 stage 상태, 즉 commit 가능한 상태로 변경하기 위해 아래 명령어를 입력합니다.
이거 머임요?

당황하지 말고 계정 등록하시면됩니다.
git config --global user.email {깃허브 가입 이메일}
git config --global user.name {깃허브 닉네임}이렇게 2줄 입력해 주시면 됩니다.
# 전체 파일 선택후 stage로 올리기
git add .

# 원하는 파일만 선택 후 stage 올리기
git add {파일명}현재는 폴더에 파일이 하나기 때문에 git add . 해줍니다.

이후 git status를 입력하면 초록글씨로 바뀐 걸 볼 수 있습니다.
해당 파일이 stage로 올라간, 즉 commit 가능한 상태로 변경되었다는 것입니다.
# 커밋 메세지 적어주기
git commit -m "test: 레포에 파일 올리기 테스트"위 명령어와 같이 자신이 원하는 commit 메시지를 적어서 입력하면 꼬리표(커밋메시지)가 달리게 됩니다.

# 레포에 push하기
git push origin mainRepository로 올리기 위해 git push 명령어를 사용합니다.
지금은 branch가 main(or master) 하나기 때문에 그냥 git push를 해도 되지만
git push origin {branch}로 하는 게 나중에 프로젝트에 이롭습니다.(안 하면 해로울 수도)
이제 다시 github로 돌아가 새로고침 해주시면

이렇게 파일이 올라간 것을 확인할 수 있습니다.
이외에 git 명령어들이 많은데 그건 나중에 알아봅시다.
git add
git commit
gut push
일단은 3가지만 기억하시면 됩니다.
'알고리즘 > 알고리즘 스터디' 카테고리의 다른 글
| [Git] 코드에 이슈 달기 (0) | 2024.07.12 |
|---|---|
| [백준허브] 백준허브로 자동 커밋하기 (0) | 2024.06.29 |